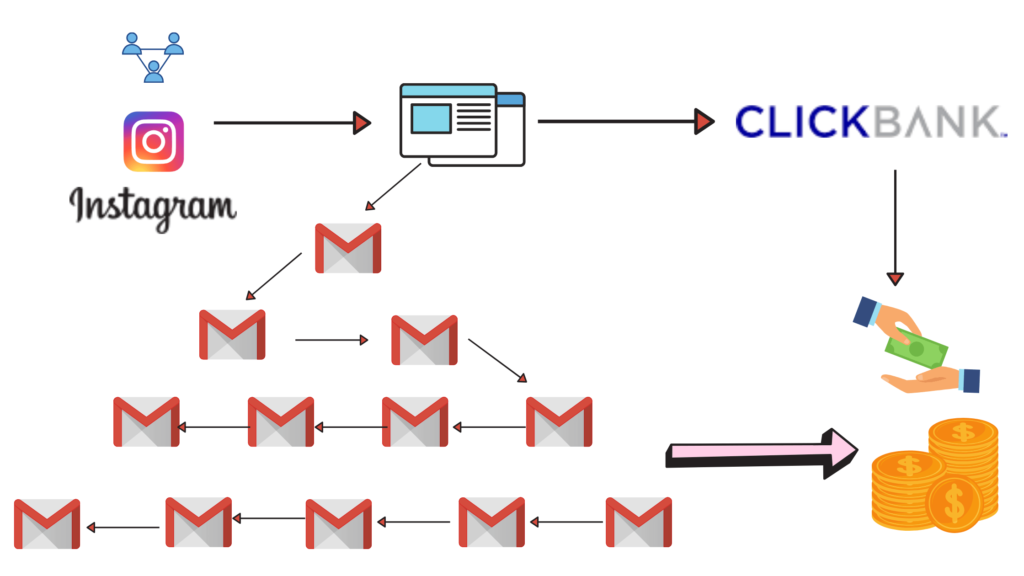
So to promote ClickBank Products on Instagram you will need three important things that is a good and high converting product, an Instagram influencer account, and good content that drive engagement and continuous traffic. You will have to optimize your bio with the appropriate call to action to Get your followers to click the link and head over to your landing page.
On your landing page you shall have an opt-in form that gives away an irresistible lead magnet that offers some information about the product you are promoting then add these fans to an Email list.
You will then follow up with these followers via email and build a relationship with them as you promote your ClickBank products. All you focus on from no is to create more content that drives traffic, you even don’t have to create your own content.
Below is an illustration of the strategy.

So how do you implement this strategy, hold on and read on to the end to find out how you can get the results promoting ClickBank affiliate products or in general any affiliate product using the Instagram platform.
Step 1
Signup For A Free ClickBank Account
If you don’t have a ClickBank account you can create a free account in just a few simple steps.
All you need is a working email, a password, your address information, a phone number, and banking information to ensure you get paid whenever you make a sale.
Once you have confirmed your email you add created a new ClickBank sub-account which you can create by clicking the create an account button inside your dashboard.


Since the new update for all new accounts created in 2020, you can manage multiple sub-accounts under one master account dashboard.
This is very important and powerful if you promote multiple offers and wish to track your sales differently.
So once you have created your Free ClickBank sub-account for the specific offer you wish to promote then it’s time to move on to the next most important step.


Choose A Niche
Instagram is a platform based upon interests and niching down will help you get the most targeted traffic for your offers or even landing pages.
With ClickBank You will find a lot of products in any niche and you will never run out of products to promote.
If you would like to get the best results with Instagram you will like to have a niche that is more visual as the platform is image and video based. However text inform of pictures and videos can also work.
Here is a list of the best niches to consider for your ClickBank and Instagram marketing strategy.
- Health and fitness
- Beauty
- Fashion
- Animals / Pets.
- Traveling
- Food and cooking
- Lifestyle
- Motivation
- Spirituality
- Sports
- Music
and so much more…
Now that you have your niche figured out, You will need to choose two products to promote. You can read this article on how to find the best products to promote.
Recommended: How to choose the best ClickBank Products to Promote.
If you have your two best products you wish to promote its time to get on the next step and this is to really set everything up. We are going to set up the landing page first and then move over to Instagram.
Create A High Converting Landing Page.
If you have read the previous article about the best products to promote you should already have an affiliate resource with the lead magnet ready.
Our purpose in our promotions is not to sell the product on Instagram. That’s where all beginners go wrong.
If Instagram notices your main purpose is to take people off the platform then you are affecting your account. You need to keep people on the platform as much as possible.
That is why we have a lead magnet to offer them in exchange for their email and after we push them back to our content (The platform).
To create the Landing page we are going to use Getresponse or Convertkit for those that are starting out and have no budget. So choose one and let’s continue.
Getresponse comes at a basic plan of $15 a month and offers better features than the free plan of Convertkit doesn’t.
Login into your Getresponse and head over to the menu then click on create a list.
Under landing pages in the menu, you will want to create a landing page. This is the link we are going to drive the traffic to and build our follower list.
There are a bunch of templates available but choose a simple template then customize it according to your lead magnet.
If you need some tips on how I create high converting landing pages then you will want to read this article where I explain everything in detail
Recommended: How to create a landing page for free using Aweber?
After you have your landing page ready with the best headlines and kept it simple with a strong Call To Action.
You will want to add a thank you page and on this page, you can link to your socials to ask these visitors to follow you if they haven’t yet.
Alternatively, you can add a button to redirect them to the sales page of the product though I don’t recommend this.
Pro Tip: If Instagram notices you trying to get people off the platform, they will punish your content reach. so keep that in mind.
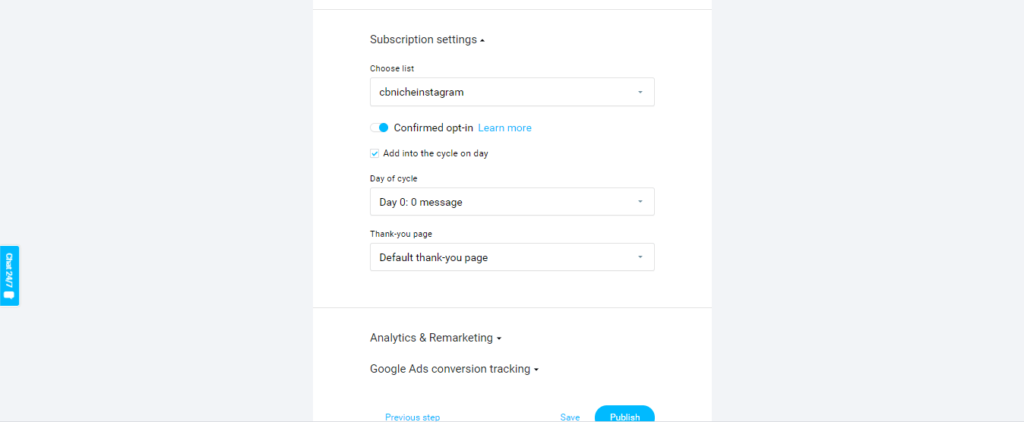
After you have customized your thank you page, go ahead and edit the landing page settings connecting the landing page to the appropriate list you created.
In this example I connected my “cbnicheinstagram” list to the landing page. This will automatically add people who optin through this landing page the list specified.
This is one powerful feature you get that is missing in the free Convertkit account.

I recommend creating an email sequence workflow which you can access in the top menu of Getresponse.
When writing your next follow emails ensure you keep the content 50/50 which is 50% helpful content based on your niche and 50% promotional emails.
If you have no idea which helpful content to write, it’s simple google for some tips and then rewrite them in the emails in simple words that are consumable.
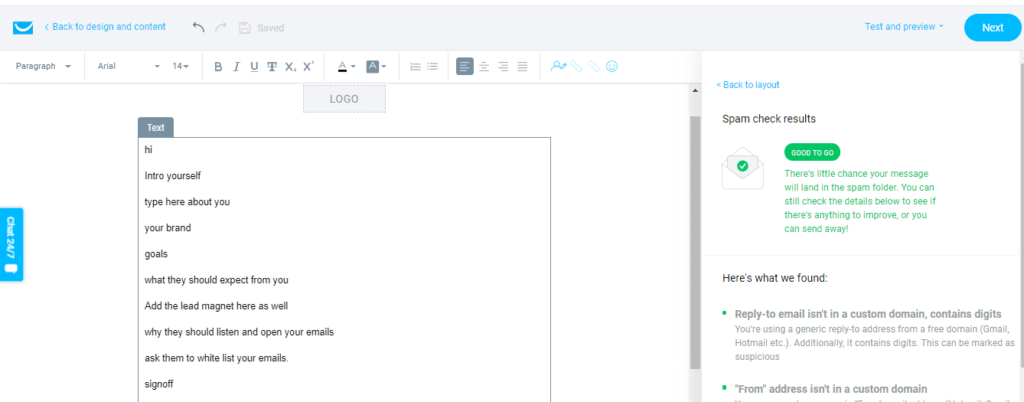
After creating your thank you page, you will need to write a welcome email to deliver your lead magnet.
If you have no idea what to write he is what you can write about in your welcome email.
- Introduce yourself
- Tell them about you
- What you think you have in common with them.
- What they should expect from your emails
- Ask them a sifting question “What do they struggle with”. This will help you find better tips and products to send them in your future emails
- Add a video of you telling them to whitelist your email or add it to their favorites.
- Deliver your Lead magnet.
- Sign off.

To add your Lead magnet you can deliver it as a link which you can simply get by hosting your lead magnet in a google doc then share the link to the google doc.
If you have a website you can easily upload it under media then get a link to it with your custom domain.
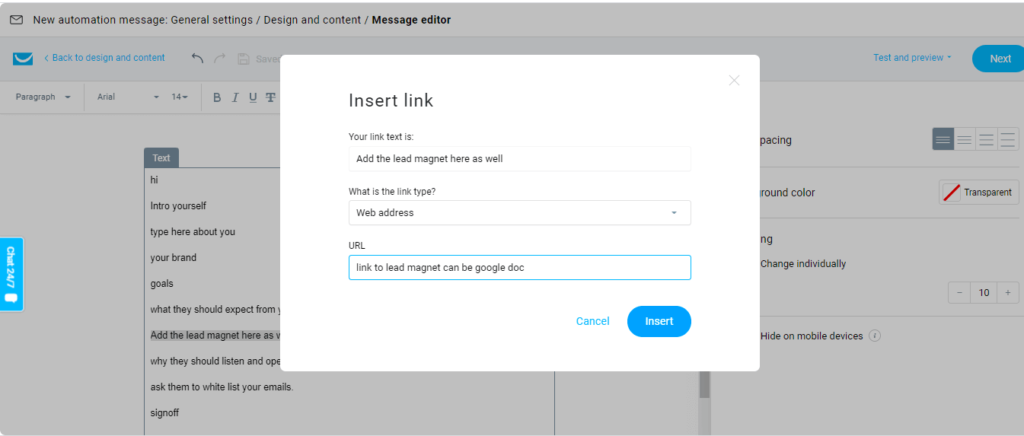

It is important to always deliver the lead magnet in the welcome message. ensure you don’t forget.
Save your email and publish your workflow. If you need more help with creating workflow check out this tutorial on Getresponse automation workflows.
Recommended: How to create an email automation workflow in Getresponse.
To get the link to your Landing page, simply head over to the settings icon on the right of your landing pages then copy that link and customize it to look cleaner.
You can use free services like bit.ly which will track the number of times your link was clicked monthly.
For my free Convertkit users, you will need to login and create a landing page by navigating to the landing page and forms menu at the top.


Click on landing page and create a landing page using any of the best templates available.
If you need the best templates I recommend for Convertkit landing pages consider checking out my in-depth Convertkit tutorial.
To create the landing page in convertkit, model the sales pages headlines or add the catchy headline that is used on the lead magnet itself.
After you have created your landing page and you will have to add your lead magnet you which you can easily do by clicking Settings at the top right>Incentive>add an incentive email on the confirm subscription button in the email, then attach the lead magnet in a pdf or doc you have downloaded from the affiliate resources page
You can choose to send an incentive email or automatically add new subscribers to your email list which I don’t recommend as often people enter junk or spam emails.
You can read about the importance of incentive emails on the Convertkit blog.
With Convertkit it’s easier to create landing pages and you can watch this video I made below to help you make them even faster.
I also offer you a free traffic source that can help you drive traffic to your landing page.
Creating Your Instagram Influencer account
First before you signup you will want to create a catchy user name that stands out and is easy to remember
A free tool that I recommend when coming up with an awesome name is lingojam
This website will come up with a huge list of names that you could use depending on some seed keywords you enter.
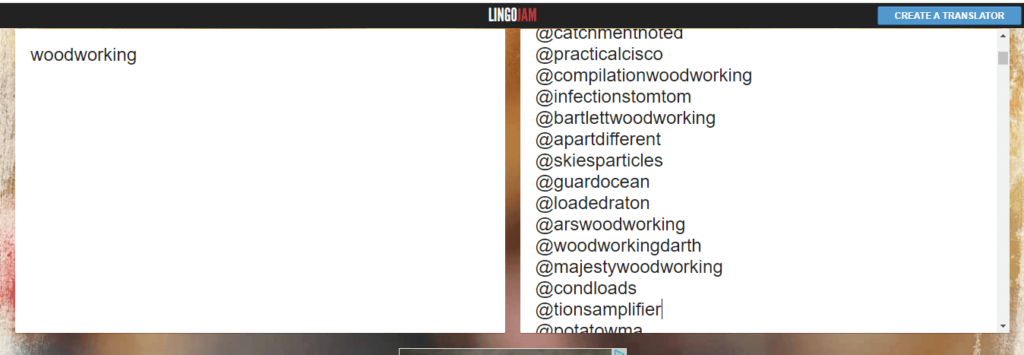

For example, I entered a seed keyword woodworking and it gave me a list of good names like
- @substitutesironing
- @calcneurology
- @catchmentnoted
- @practicalcisco
- @compilationwoodworking
- @infectionstomtom
- @bartlettwoodworking
- @apartdifferent
- @skiesparticles
- @guardocean
- @loadedraton
- @arswoodworking
- @woodworkingdarth
- @majestywoodworking
Hope you get the idea now.
The best Instagram name should be a word that is catchy, easy to recall and have no numbers, underscores and periods.
Ensure that you have a name that has a keyword in it for search purposes on Instagram. This will help you get some exposure.
Here is an example of s good Instagram bio you can model. This is one of my Instagram accounts that I am growing.
I will admit I am not consistent but am going to share with you a few things I discovered to help you with your success.
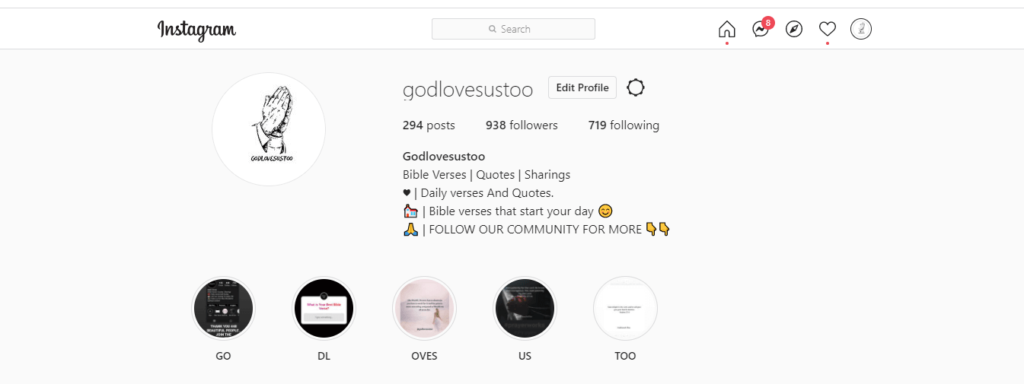

What makes up a good Instagram bio?
The first thing is to add keywords in your bio. For example in the image above you can see that I added a few keywords for my niche such as Bible Quotes, Verses, and Sharings.
This will help you rank on certain hashtags, and general searches.
Add an expectation people who follow you will get, such as new bible verses to start your day.
This tells them I post new content daily in the morning. You can also ask them to turn on post notifications if you don’t mind.
Then add a call to action. Ask people to follow you. People do this only when told to.
So You should always ask them to follow you and add an emoji pointing to the follow button.
Secondly, you will need to have your username match your name. You can see in the image above that I keep my username the same as my name. (godlovesustoo)
Add a nice logo. If you are starting out create a nice logo and if you are not sure if it is a nice logo ask a couple of people like family and get ideas if it would be a nice logo to add to your profile.
You don’t need to invest any money to get a logo created. So take your time and create a good one.
The most important thing you must do and most Instagram so-called experts don’t talk about is adding your category.
In your bio settings scroll down and you should see a category section. This will tell Instagram more about your account and where to recommend your content.
Powerful though not always talked about right!
Other important things to set up in the beginning.
Convert your new account into a business account from the start. This doesn’t affect your account in any way.
This will help you track your content performance and give you more insights regarding engagement.
Instagram growth Strategy
This is the moment I love most because I am going to share some of my best skills, practices and tools to help you as well.
First I want you to get these few factors clear if you are to make this strategy work.
- You should never engage in any form of engagement group.
- You shouldn’t use spam hashtags for example “like4like“.
- You should post at least 3 times a day consistently when starting out for the first 3 months.
Am going to give you the best tools to help you stay consistent without burn out. Okay with that out of the way, let’s implement the strategy.
Create your first couple of 12 posts to fill out your profile. To get content to post is easy go to the top 3 accounts in your niche. One under 1000 followers the second being above 10,000 followers and the largest being 100,000 followers.
Check for content that has been posted in the last 28 days on each account. Looking for posts, videos, IGTV and reels performing better than average and then repost those to your profile.
You should then have content to post so that is not an issue. You can download the repost app from Appstore or Play store.
Pro tip: When you hit your first 1000 followers start creating your own branded content.
To create your own content model what type of content has been performing better for you in past period of reposting.
If you are in a niche for which it is had to create content for then you can continue reposting other people’s content while giving them credit…
This is important credit people who own the content you have reposted. This will ensure you don’t face any copyright infringement issues later on.
Using Hashtags
Hashtags are powerful in that I was able to hit the explore page when I had 596 followers.
The best apps I recommend for the best hashtags is Flick. Flick will generate hashtags guaranteed to bring engagement like this below.
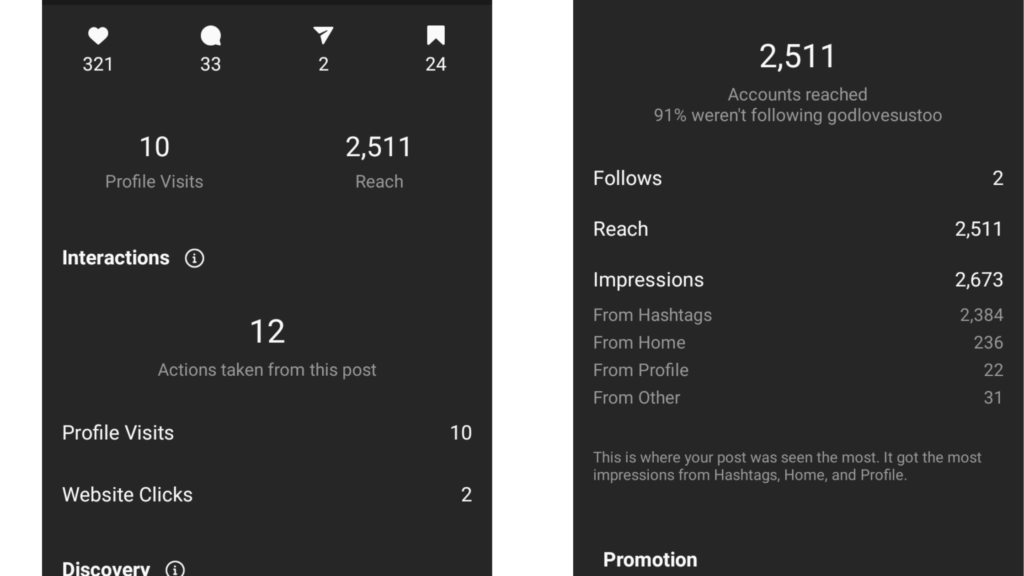

Flick will generate the best hashtags, check for banned hashtags to avoid your account being banned on those hashtags.
It costs about $15 a month but its worth it. You can get a 7 day free trial here
You can use other tools but you will not know, you will always be guessing.
The best one I can recommend you use is quite closer to Flick is Ingramer. This will rank the hashtags in the category of those easier to rank for and the hardest so you can get some good results though not often.
How to get your first couple of followers on your Instagram account!
You are going to find a list of 5 influencers like you. The list should have 3 Instagram influencers that are creating original content and the two should be reposting other people’s content.
Why do you need 5 accounts let me explain…
If you have read the Traffic secrets book by russell Brunson then you should be familiar with what am saying.
These 5 influencers are our Dream 5 so they have our target audience already following them. So we have to make our way in front of target audience by first getting in front of those already gathering them.
How do we do it simple?
First open up a google doc and make a table with 5 rows and three columns. In this table add the names of your influencers and the time they usually post.
Then choose one with a relatively lower number followers. The accounts you choose you should have a large number of followers than following.
Then go a head and take a look at their content and see if they are not in an engagement group.
Check their recent posts and see if accounts in the same niche are commenting on their posts and liking them. This is a sign they are in an engagement group.
This will get you no where and kills your success on the platform.
After you have verified they are not in an engagement group go ahead and take a look at their following. Ensure they are following real active people.
Then check their followers and check if they are real people as well. This will take time but trust me it’s worth it. You don’t want to follow a bunch of robot accounts.
Once you have proved they are real and active people. Then you are going to go back to your profile and create 12 posts to fill out your profile. You should have done this already before you start following people.
Note I said 12, and ensure they are 12 when starting out. Then its time to get your first couple of followers.
Go back to the account you were previously analysing and follow the first 20 followers on their profile for the first 24 hours. Then take note of who followed you back.
Don’t unfollow any one yet. Then do the same for the next day but follow up to 40 in 24 hours. Then continue as you take note of those already following you back in a google doc.
This will make the unfollowing process easier.
When unfollowing people ensure you unfollow 5 people a day take it slow because your account is still new.
You should give people a month before you unfollow them. By the time the month elapses you should have got your first couple of hundred followers.
Remember our target is 200 followers by at least the first 2 weeks.
Use this strategy until you hit 200 followers then stop. We doing this to buy data from Instagram on our new audience.
If you hit 200 followers you will unlock the best posting time insights. This is important for our success. Because when want to post when people are active.
This is the best strategy for engagement on our content and Instagram will promote it further to new audiences.
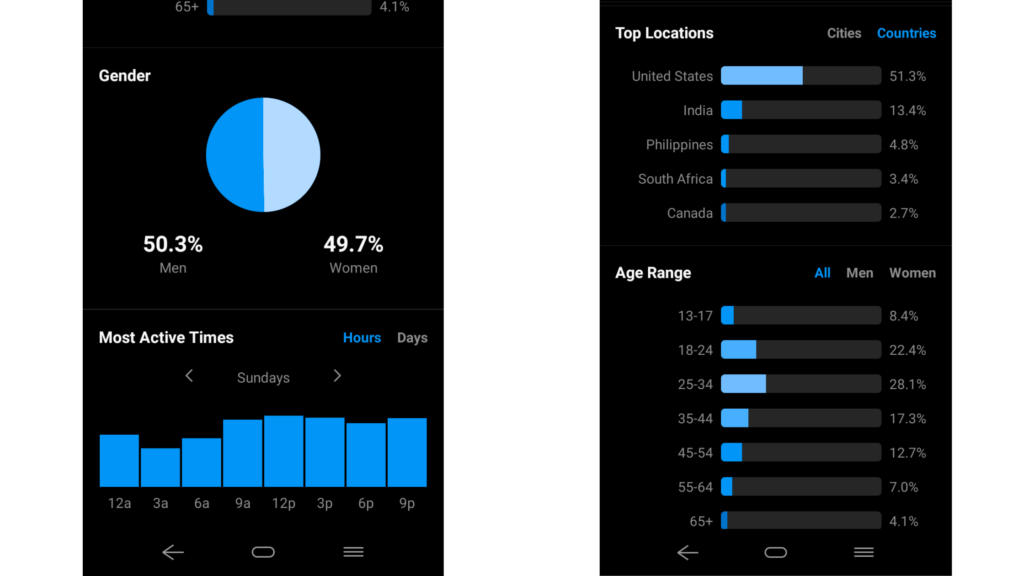

With the Instagram Insights you are able to see the best posting times which can be hours or even days respectively.
You can also get an idea of the countries your followers reside to help you find the best products to promote to them .
Always keep your number of followers higher than those your following. This is how people will know you are not spamming everyone by following everyone you find.
Note that I don’t even talk about following people who like the latest post of this Instagram account you are following. Why
I found that some people like a picture because it just poped up in their feed or a friend shared it but they may not be interested in that type of content.
So hat do you do, simple after you have crossed 200 followers you have gathered insights about your current audience this will make the work even more easier.
However much this guarantees best active followers we had to buy data first so that we can focus on reposting content at the best times for the best results.
After hitting your first 200 followers go back and now switch up the follow strategy.
Follow only those that engage with the latest post of this influencer account.
After a month go back and get another influencer from the google doc and repeat the process till you are done with all the five accounts chosen at the start while following those that like the recent post only.
By the time you are done with this strategy, you should have your first 1000 followers then stop following people.
Scheduling Content and Scaling up
If you want an all in one tool with scheduling power and hashtags as well then you might want to try out Tailwind
Tailwind will help you schedule content for Instagram up to months ahead. This will allow you to avoid burn out by the 6th-month mark.
All you do is find content to repost and schedule it then focus on writing emails for the back end follow up in Getresponse or broadcast for Convertkit users.
Here is what is Tailwind can do for you!
- Schedule Photos & VideosSave time by scheduling with Auto Post.
- 1-Click Hashtag SuggestionsMultiply your reach with perfect-fit hashtags for every post.
- Always Post at the Best TimesSmartSchedule picks the times when your audience is most engaged.
If you need an alternative to Tailwind I got Planoly which can help you also schedule up to 30 posts a month for free.
Planoly however doesn’t offer you hashtags so you will have to figure out your way around that. If you want more scheduling posts then you may have to upgrade.


